Tuesday, June 1, 2010

London Part 2

Hey hey heyyyy

Ok so i did end up going back the next day to London but i went up to the North over the weekend so i couldn't upload the pictures earlier! 

I went back to NARS and got some things and i didn't mean to but i walked past a HUGE MAC store in Covent Garden and. Well. You know. Hehe. I'm saving MAC for the airport though. Heathrow has a MAC counter and they usually have everything, even the stuff that is usually sold out everywhere else!


NARS Sheer Matte Foundation (Stromboli), GBP29/S$55.10


I heard WONDERS about this foundation so i had to buy it for myself. I'm a MAC NC25 (i think) but i got pretty burnt over my holidays so every foundation i own now is too light for me. So i went to the John Lewis near Regent Street and the dude matched me to this colour. I gotta say, he was really good and really patient with me. We had to try tons of colours cause i wanted a perfect match.

Ok this is a medium coverage foundation so if you want an absolutely flawless face, you should go with something else. But i don't believe in masks so i think medium coverage for day wear is good enough. Maybe for a night out you could go with something heavier. But then again the NARS sheer matte is buildable. I was recommended to use my fingers for this foundation but some have also said that i sponge would work well too. I heard it can be quite streaky looking if you use a synthetic foundation brush but i haven't tried it so i will get back to  you guys again on this.

For colour matching, i think the best thing you should do is actually go to the stores and get it. I know we can't get NARS in Singapore but if you buy it online, i really can't guarantee that you'll get a good colour match. Even when i went to the shop, i thought i was a certain colour but really i had to try so many different ones before i found the perfect shade.

I know everyone says the sheer glow is better but with my skin type and with the weather back home, i really don't believe in anything that has the word glow in it. I'd rather be safe and stick to something matte.

NARS Lip Gloss (Striptease), GBP17/S$32.30


It was a fight between this and the Turkish Delight lip gloss but i couldn't sleep after not buying this so i had to get it. Its a really nice nude gloss and less pink than the Turkish Delight. This would go great over a nude lipstick or would even look nice just on its own if you've got  a strong eye on. 

But i do think that NARS is really expensive. I mean Laura Mercier was even more expensive and i love NARS but with price as a consideration, MAC is cheaper and could probably give you the same satisfaction as NARS. But it is really pretty and the artistry behind the products is amazing. In the John Lewis shop today, they've actually got NARS international lead makeup stylist, James Boehmer who works closely with Francois Nars to do sessions with people. So its 35 pounds i think for a session but its fully redeemable for NARS products. 


MAC Eye Shadow (Humid), GBP11/S$20.90


I bought this as part of the MAC To The Beach collection but it is a permanent colour. Humid is one of the most talked about green eye shadows and i've been wanting to get it so as soon as i saw it as part of this, i grabbed it. I love the packaging. Its so fun and summery. Of course the Liberty of London collection was the prettiest ever and i will do a haul on that once i get back home. The green is quite an intense green with shimmer and i think i like this most when its used just as one colour all over the eye. Pop on some eyeliner, and you're ready to go. If you want to try colours, summer is the best time. So please take out all your green, corals and bronzes and use them! 

I haven't tried anything other than the Turkish Delight lipgloss so once i do and i use the foundation, i will let you guys know how it is :) 

That's all i have for you today!

Love, Tasha

Thursday, May 27, 2010

London Part 1

Hello my lovelies, how've you been?

The first place i ran to once i hit Europe was Laura Mercier! There were a couple of things I've been really wanting to get from there so of course i bought them in like 2 minutes.


Laura Mercier Tinted Moisturizer SPF 20 (Bisque), GBP32/S$60.8


Yes i know, it was really expensive but i've read so many good things about it that i had to buy it! And its a 50ml tube.The girl at the counter helped me choose from a few colours and bisque fit me best. I tried to get a good picture of the colour but it didn't come out nice cause of the lighting but here you go, http://www.lauramercier.com/store/shop/Tinted-Moisturizer_Tinted-Moisturizer-SPF-20_prod210061. I'm quite in love with this. The salesgirl applied it for me at the store and i wore it the whole day. It was wonderful. Very light, medium coverage, it doesn't get very oily and it didn't melt. Of course the British weather helped. But i still think this would work really well for our Singapore climate. I'll use it when i get back home and let you know more about it!


Laura Mercier All Over Eye Colour Brush, GBP24/S$45.6


The other thing i've been wanting is a good all over eye shadow brush. I keep wanting to buy the coastal scents ones but i never get down to it. This brush from Laura Mercier is really good. The bristles are not too long so you will have a good control of your colour and i find that there is less fallout when the bristles are not too long. And the brush feels awesome! It would work wonderfully if you just plan to use one eye shadow colour and it would work well to use with a base eyeshadow. I know its a little pricey but its really quality stuff and the MAC brushes are not cheap as well anyway.


So thanks to the wonder of Selfridges & Co., we not only get awesome salt beef sandwiches. We also have: NARS. Thank you London.


NARS Cream Blush (Penny Lane), GBP19.50/S$37.05


Mel darling this is for you :) So they had a bunch of cream blushes but this one was really pretty! Its a kind of nude pinkish brown colour that will give a really nice glow to your skin. I always believe that as much as colours are really fun, a nude-ish colour like this will give a nice healthy glow to your skin and because of the texture of cream blushes, the right shade will give a nice natural flush which is really pretty and could match everything.

Mel says her skin holds cream blushes better than normal blushes. Lucky girl. But for those of you who find that the cream blush doesn't stay, you can dust a finishing powder over it (i use the MAC Prep + Prime transparent finishing powder) and it works wonders. But make sure you get a really light fluffy brush otherwise you're going to wipe the blush all off.

Again i couldn't get a nice shot so here you go :) http://www.narscosmetics.co.uk/color/blush-and-bronzers/cream-blush.html


NARS Lipgloss (Turkish Delight), GBP17/S$32.30


Only the most talked about lipgloss in the world. I'd never seen it in person before until i got to the store today and i have to say that it's a lot more of a marshmallow pink than i thought it would be but its still hell pretty. The shimmer isn't too strong and it just gives a nice sheen to your lips :) Makes the boys go crazy. Although i do know many boys who hate lip gloss. Hmmm.

This is great over a nude lipstick and even more wonderful on its own. Because its quite cool toned you can also use it to tone down a lipstick you think is too strong. If you want a lipstick that goes with everything and that isn't too shiny, turkish delight is the way to go. The texture is good too. I hate hate hate sticky lipglosses and those that bleed over your whole mouth. So far this one has been okay for me but i'm going to use it a couple more times before i make my judgement! 


So on a final note, the prices in SGD are an estimate. The exchange rate today was about 1.9 so i used that so it might not be exactly accurate but it is how much i paid in pounds :)

IF ANYONE IS IN LONDON, HOLLER AT ME! :)

Take care guys! See you really soon! Like tomorrow? :) Hehe.

London Peace and Love, Tasha

Back in Business

Hey guys!

Many apologies for the longggg absence. Its been quite crazy, i've had to do so many things lately. So sorry for that. But we're back! Judy just did an awesome entry on cheesecake brownies and she's gonna do more for you really soon!

Just a little update, i'm in London so for the next few posts, i'll be showing you guys some make up stuff i picked up in London! London has awesome awesome make up. Today i found out that Topshop has a make up range! So i'll check that out tomorrow and show you guys some nice stuff! :)

Look out for London Post Number 1!

Love, Tasha

Saturday, May 15, 2010

Cheesecake Brownies

Thank goodness its over!!! My exams I mean. And university life. I'm gonna be graduating this semester so anyone know of any good job opportunity, please let me know.

And can somebody please tell me whats up with the humidity levels recently? It feels like a sauna outside on most days. And as Tash would gladly testify, that's never good for your makeup (right babe?). Annoyed, annoyed, annoyed.

Anyway. So the other day, me and Mel decided to bake some cheesecake brownies. If you haven't yet tried out these brownies, please do. They are awesome. Except for the part where they stuck to the aluminium foil. Usually I use baking paper but I thought I ran out of it so I decided to use aluminium foil instead. Bad idea. Just stick to baking paper next time. It'll save you a lot of trouble. Unless of course you like scraping off gooey brownie bits of aluminium foil. Which honestly wasn't that bad...

Here's a list of all the ingredients you'll need:

For the brownie part,
175g unsalted butter
350g white sugar
Pinch of salt (if you're using salted butter you can leave this out)
80g cocoa powder
1 tablespoon vanilla extract (or milk)
3 eggs
80g all purpose flour

For the cheese part,
250g cream cheese (1 block)
2 egg yolks (not the whole egg!)
7 tablespoons white sugar


First, combine the butter, 350g sugar, salt and cocoa powder and set it over a double boiler. Let the ingredients melt and combine, stirring occasionally.


After about 5-10 minututes, it should look something like this: grainy, messy and coarse.


At this point, take it off the boiler and add in the milk or vanilla extract. Stir and allow the mixture to cool for about 10 minutes. Do not add in the eggs yet because the heat from the mixture will cook the eggs upon impact, causing it to curdle and ruin the entire batch.


Once the batter has cooled, add in the eggs, one at a time, stirring after each addition until well combined. The batter should be smooth and thick by now.


Now, sift in the flour and fold until the flour is completely incorporated. Set aside the entire batch.


In another clean bowl, cream the cheese, yolks and 7 tablespoons of sugar until smooth. It should look something like the image above.


Now comes the fun part. First, preheat your oven to 180 degrees Celsius and position our oven rack in the middle. Then, pour the brownie batter into a lined 9 X 13 inch baking tray. Use baking paper, not aluminum foil as I did. This is because the brownie will stick to the aluminum after baking - not pretty. Trust me. Once all the brownie batter has been poured, slap on the cream cheese mixture on top (see pictures above) and swirl using a spatula/knife/whatever you have on had. Don't worry about being too neat or messy. Just swirl it and have fun!

After which,chuck it in the oven and bake for 35 - 40 minutes. Check for doneness using a toothpick inserted right into the center. It should feel moist but not dry.


The end result should look like the picture above on the left. Lovely ain't it?

Peace out!
Judy (and Mel!)


Yea baking is glamourous, what can I say? I wonder how Nigella does it. Hmmm.

Thursday, April 15, 2010

Sesame Biscuits


I wanted to call these sesame cookies but the word 'cookies' just sounds too ang-moh for them. Some how biscuits suit them better no? Anyway, my exams are around the corner so I've been off baking recently cause of my schedule. I did however manage to squeeze in some time for these lovelies.


Not that they took up much time anyway. To be honest I sort of baked them on a whim. I just used whatever ingredients I had on hand. Surprisingly, they actually turned out pretty good. The sesame taste isn't overpowering at all. I ran out of brown sugar so I used muscovado instead. For those of you guys who don't know what muscovado sugar is, basically, its a very very dark type of sugar, bordering on bittersweet. Its pretty moist so don't use too much of it or you'll end up over-browning your cookies. I've tried using it to bake a carrot cake once and the whole thing came out a big brown mess (although it tasted amazing ha). But if used in moderation with white sugar, it does work out fine so don't worry.

Anyway, here's the recipe I came up with:

Ingredients 


125g unsalted butter, room temperature
125g white sugar
2 tbsp muscovado sugar
1/4 teaspoon salt
1 egg
1/2 teaspoon almond extract
1/2 cup plain flour
3/4 cup self-raising flour
25g black sesame seeds (or more if you like)

Cream butter, sugars and salt until smooth. Add in the egg and almond extract blend until well incorporated. Sift in the flour 1/2 a cup at a time. Fold until batter is smooth. Add in the black sesame seeds and fold again until seeds are evenly distributed throughout the batter. Cover and chill the batter in the fridge for one hour.


Heat oven up to 180 degrees Celsius. Position rack in the middle. From but the teaspoon onto a prepared baking sheet. Bake for 17 mins until top is golden. Remove and cool before eating/storing.

Enjoy!
Judy

Wednesday, April 7, 2010

make up palettes = happiness

Hey guys!

So as promised, i want to share with you guys some of my favourite eyeshadow palettes! Some of them aren't available anymore but i'm sure there are great dupes around and if you need any help finding something, just email me and i'll try my best to help you guys out with it! :)


MAC Spring Colour 4 Forecast (Colour 4), $65

Ok so sorry about the swatches. The colours are really close to my skin tone so i know they don't come up well! 

When Chanel came up with their Spring quad of neutrals i was like, you know what, every girl needs a neutral eye shadow quad. I think its the most useful quad you can have because you can create smoked looks, neutral looks, dark and light looks, a whole bunch of stuff with just your neutral brown quad. Thing was, the Chanel palette was $88. So when i saw this at MAC, i had to get it! And i'm loving it :) I think this quad might be sold out though so you can try eBay or just go to your favourite make up store, grab a 4 piece palette and start filling it up with these type of browns and create your own neutral palette!

Manila Paper (veluxe pearl finish): This is the highlight colour of the quad and a close dupe would probably be Nylon. I think this is really pretty for just an all over wash of colour and a nice coloured eyeliner.

Flip (frost finish): I love this. Its a champagne gold colour that leaves a nice suttle gold sheen to your lids that is not too overwhelming so it can be used in the daytime. I would totally use this everyday and for every occasion. Its so pretty.

Aztec Brick (veluxe pearl finish): This is a bronze, very warm eyeshadow. I'm not the biggest fan of reddish brown eye shadows so this was my least favourite of the lot. But of course it goes very well in creating a nice smokey eye with the rest of the colours.

Creole Beauty (frost finish): Medium dark bronze with a nice bronze gold shimmer. Its really pretty and i like to use this as a crease colour with flip as an all over colour underneath. I think its the perfect brown eyeshadow. It will suit every skin tone and its buildable for a dark smokey look and its also light enough to blend into your crease as a soft crease colour.


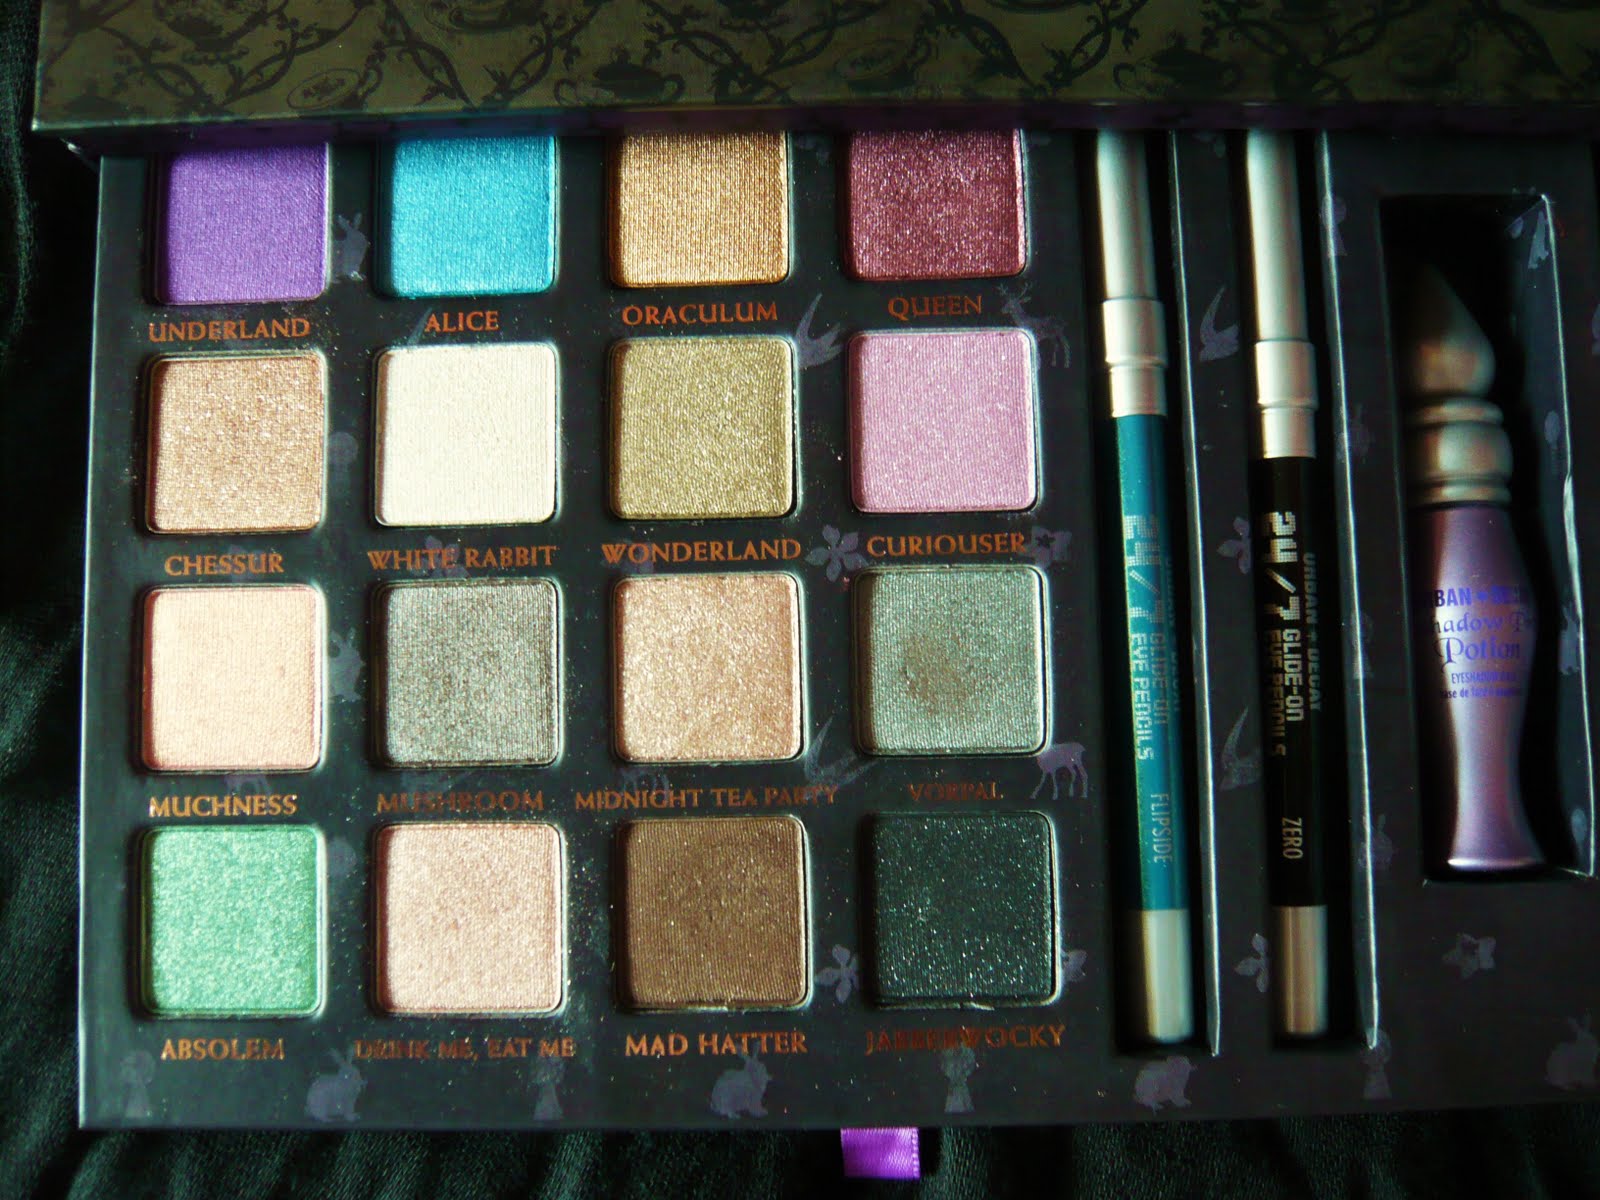
Urban Decay Alice in Wonderland Palette, $88

The palette comes with two 24/7 glide on eye pencils and a mini Primer Potion! I am a HUGE Alice in Wonderland fan so i started buying all the merchandise. This was the most fun :) 

The beauty about this palette is that the colours are normal Urban Decay eye shadows that you can buy separately. So if there's one colour you really love, you don't have to worry about it ever running out :) I've put the names of the actual colours in brackets. The colours are swatched in the order that they appear in the palette

Flipside (turquoise) : This would give a really nice pop of colour to your eyes on days when you don't want to use eye shadows! I've been into the whole coloured liner, no eyeshadow thing lately so this is great :) You can even try a black liqud liner on your upper lash line and a coloured pencil on your bottom lash line. 

Zero: Only one of the best selling black eye pencils in the world. Its creamy enough that it can be blended out but these pencils also have amazing staying power.


From left to right:

1st row: Underland(Flash), Alice(Painkiller), Oraculum(Baked), Queen(Last Call)

2nd row: Chessur(Chopper), White Rabbit(Polyester Bride), Wonderland(Maui Wowie), Curiouser(Grifter)

From left to right:

1st row: Muchness(X), Mushroom(Mushroom), Midnight Tea Party(Midnight Cowboy Rides Again), Vorpal(S&M)

2nd row: Absolem(Homegrown), Drink Me, Eat Me(Sin), Mad Hatter(Twice Baked), Jabberwocky(Oil Slick)


Coastal Scents 88 Piece Makeup Palette, USD18.95
http://www.coastalscents.com/cfwebstore/index.cfm/product/1677_122/88-piece-makeup-palette.cfm

I think this is a great palette for people who are just starting out with colours! There are a great range of colours, the pigmentation is good and the colours are very blendable. When i help my friends out with shoots or anything, i bring this palette cause its all i need! Its not very expensive but its well worth the money. I know it seems like there isn't much of each eyeshadow but i honestly think you don't need that much of a particular eyeshadow if you have this kind of variety. This palette is also available in the 88 piece shimmer palette and there is an 88 piece warm palette for those of you who are into neutrals! I think i paid about $40 after conversion to SGD and after shipping.


Sigma Makeup Beauty On The Go Kit Smokey Eyes Palette, USD25

I got into Sigma makeup after watching TiffanyD talk about the Sigma Makeup Series. I think she's one of the ambassadors for Sigma makeup. So the first thing i bought from them was the brush set and i was so impressed. So when the make up came out i thought why not give it a try! This is the smokey eyes kit from the beauty on the go kit and its not my go to for a black and silver smokey eye. Now the colours are really shimmery so if you're not into the whole shimmer thing, this is not for you. But the shadows are really soft, really blendable and really good quality. I really like them :)

From left to right:

Shine A Light: Its the highlight shade of the quad. Its a white shimmery shadow and i also use it as an all over colour with some eyeliner and it works great as well.

Start Me Up: Silver shimmery shadow but its a lot lighter than You Got The Silver. I think this is almost exactly like Nars Night Life eyeshadow which i love, so of course i love this too. I usually use really dark colours for going out at night but sometimes i like to change it up for a nice silver and this is really pretty :)

You Got The Silver: I love this colour. I think this is the nicest silver eyeshadow i have come across. Its a dark silver and its really nice on its own. And to jazz it up a little, mix in a bit of paint it black on the outer half of your lid, smoke it out and you're good to go.

Paint It Black: Hello Rolling Stones. Ok anyway, so this is a dark shimmery black and its really pretty as well. I match this with MAC's paint pot in black ground just for that extra intensity. The shimmer gives it enough dimension so you don't have to add any other colours with it.

Of course you can use the whole kit and create an awesome smokey eye. I like Tiffany's version of this smokey eye so you guys can go watch that for some ideas! 


Estee Lauder Signature Eyeshadow Quad M08 Blue Smoke

I've had this for a long time and i never used it till my birthday this year. And then i was like, heyyyyyyyyyyyy. Hahaha. So yes, sometimes a normal black smokey eye can be boring so, try something different. You can do a smokey eye with ANY colours you want. I like the silver and blue combination, i think its really pretty :)

There are a million ways to use this quad but what i like to do is to use the last two colours, the silver and the dark blue. I'll use the silver on my entire lid and then blend in the black to the outer third of my lid. Or another way would be to use the blue all over your eye lid and then to blend out the edges with the silver. I havent really touched the light blue (the second colour) and i think i'm phasing out of the highlight thing. Haha. So go grab your silvers and your blues and try it out! Oh and this quad is still available!


So thats all i have for you today! I hope you guys had fun :) Talk soon!

Love, Tasha